Guida all'acquisto dei fornitori di display industriali per le apparecchiature OEM
Introduzione Le interfacce uomo-macchina (HMI) sono ormai componenti standard delle moderne apparecchiature industriali. I display consentono agli operatori di ...
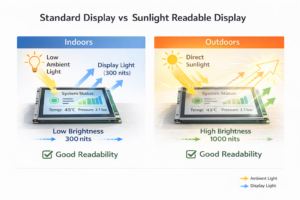
A monitor personalizzato leggibile alla luce del sole è progettato per soddisfare requisiti specifici per l'esterno o per la luce ambientale elevata che i display standard non sono in grado di affrontare completamente.
Nel 2026, la personalizzazione non si limita ad aumentare la luminosità. Richiede ingegneria a livello di sistema, tra cui l'incollaggio ottico, i trattamenti superficiali, la progettazione meccanica robusta, la protezione ambientale e la pianificazione dell'affidabilità a lungo termine.
Questa guida spiega come personalizzare un monitor leggibile alla luce del sole passo dopo passo, aiutando gli OEM e i team di progetto a definire chiaramente i requisiti e a evitare costosi errori di progettazione.
I monitor da esterno standard possono andare bene per installazioni di base, ma la personalizzazione diventa necessaria quando il progetto prevede:
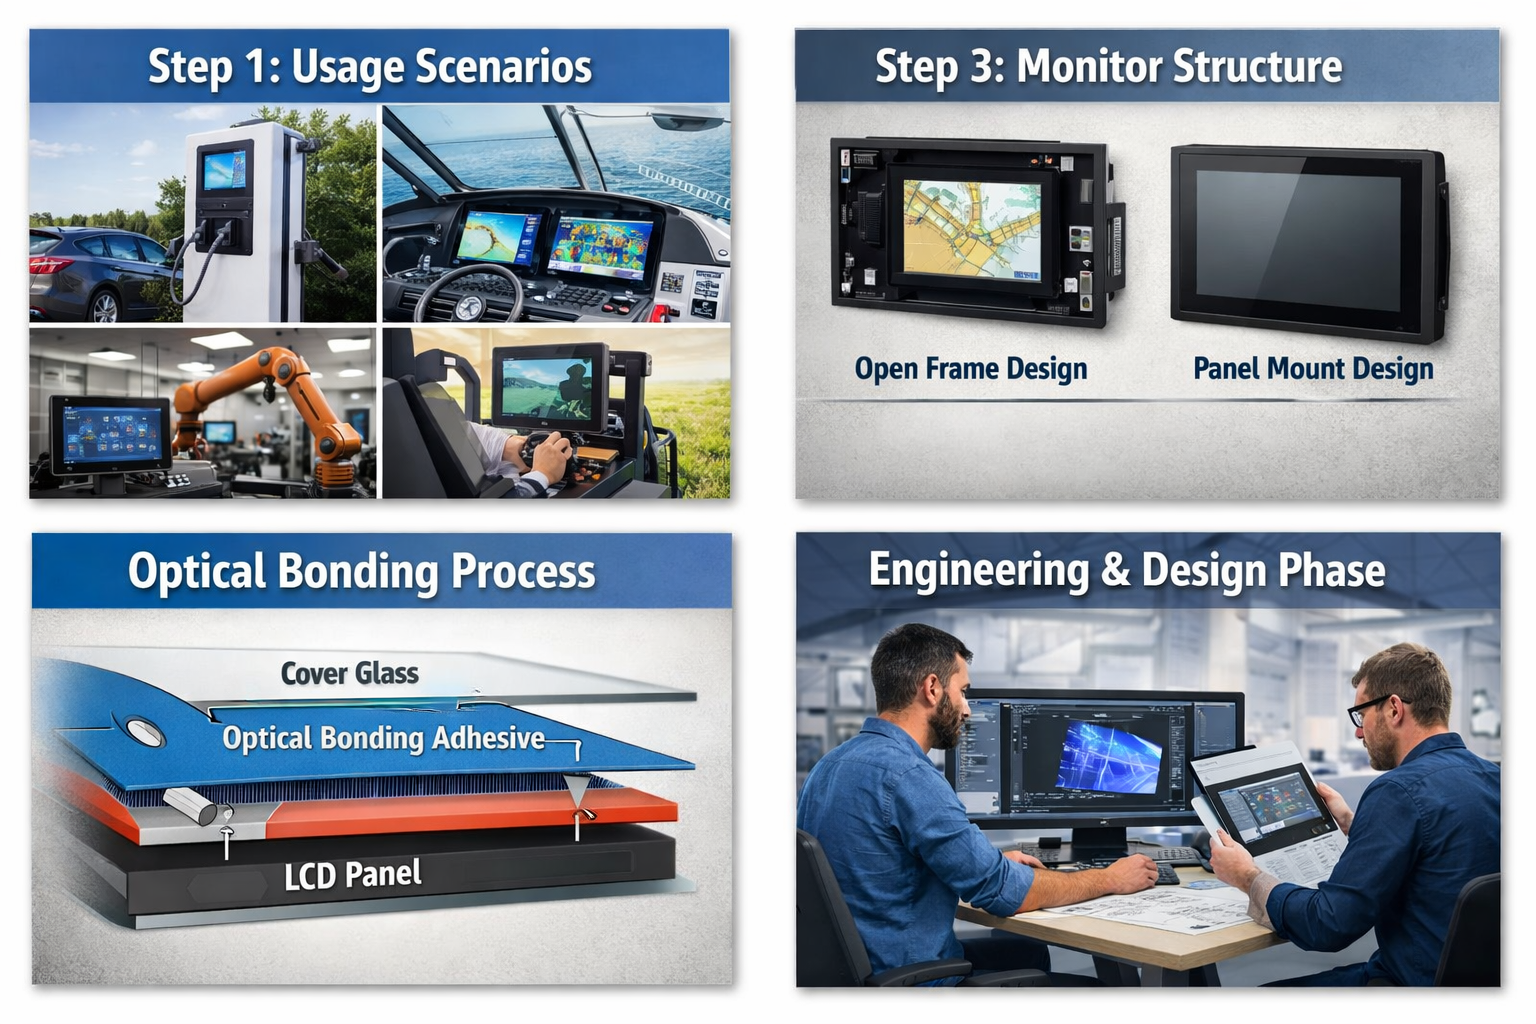
I progetti tipici che richiedono soluzioni personalizzate includono chioschi per esterni, caricabatterie EV, HMI industriali, sistemi di trasporto, attrezzature marine, macchinari agricoli e infrastrutture energetiche..
La personalizzazione inizia con la comprensione dove e come verrà utilizzato il monitor. Questa fase influenza ogni decisione tecnica successiva.
Le domande chiave includono:
Ad esempio, un caricabatterie per veicoli elettrici su strada richiede priorità di progettazione molto diverse rispetto a una console di navigazione marina o a un HMI da cantiere.
La struttura meccanica determina sia durata e compatibilità di integrazione.
Le opzioni di progettazione più comuni includono:
Considerazioni importanti:
Un display rinforzato può comunque fallire se si trascura la progettazione del montaggio.
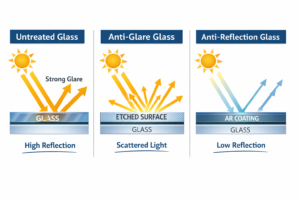
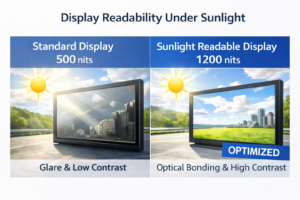
Questo è il cuore della leggibilità della luce solare.
La luminosità da sola non basta. Il design ottico gioca un ruolo altrettanto importante.
L'incollaggio ottico elimina il vuoto d'aria tra il display LCD e il vetro di copertura:
Nel 2026, il bonding ottico è considerato standard per i progetti outdoor più seri.
Le prestazioni del touch devono essere all'altezza di entrambi condizioni ambientali e comportamento dell'utente.
Le opzioni più comuni includono:
Le opzioni di interfaccia includono in genere USB, RS232 o I²C, a seconda dell'architettura del sistema e della compatibilità del controllore.
La leggibilità all'aperto e la durata devono essere progettate insieme.
Parametri chiave da definire:
Ignorare i fattori ambientali spesso porta a guasti prematuri, anche se le specifiche di luminosità sembrano sufficienti sulla carta.
Prima della produzione in serie, i monitor personalizzati devono passare attraverso un processo di validazione strutturato:
Questa fase garantisce che il progetto funzioni come previsto prima di essere scalato.
La personalizzazione non è solo una decisione tecnica, è una decisione decisione sul ciclo di vita.
I fattori chiave includono:
Una personalizzazione ben pianificata spesso riduce i costi a lungo termine minimizzando i guasti sul campo e le riprogettazioni.
Eagle Touch fornisce personalizzazione guidata dall'ingegneria per monitor a lettura solare e sistemi touch industriali, tra cui:
Per semplificare l'avvio di un progetto, forniamo una Modulo di raccolta dei requisiti del cliente che aiuta a cogliere in anticipo tutti i dettagli tecnici critici, riducendo i rischi e i tempi di sviluppo.
La personalizzazione di un monitor leggibile alla luce del sole è una processo di ingegneria a livello di sistema, Non si tratta di un semplice aggiornamento della luminosità.
Definendo chiaramente gli scenari d'uso, i requisiti ottici, l'integrazione meccanica, la durabilità ambientale e gli obiettivi del ciclo di vita, gli OEM e i team di progetto possono realizzare sistemi di visualizzazione per esterni che restano leggibile, affidabile e manutenibile in condizioni reali.
Nel 2026 vengono realizzati progetti outdoor di successo con l'ambiente, non contro di esso.
Introduzione Le interfacce uomo-macchina (HMI) sono ormai componenti standard delle moderne apparecchiature industriali. I display consentono agli operatori di ...
Introduzione I display industriali sono spesso utilizzati in ambienti in cui le condizioni di illuminazione sono difficili da controllare. Apparecchiature ...
Introduzione I display sono un componente di interfaccia fondamentale in molti tipi di apparecchiature industriali. Forniscono al sistema ...
Introduzione La visibilità del display è un parametro critico nella progettazione delle apparecchiature industriali. Gli operatori si affidano alle interfacce grafiche ...
Inviate i dettagli della vostra applicazione. Risponderemo con la direzione della configurazione e le fasi successive.